Key takeaways
- Place a tool back in the same compartment every time; consistency matters more than a perfect first layout.
- Use drawer labels or a simple inventory list for specialty tools and duplicate sizes.
- Line metal-on-metal contact points with thin drawer mats to reduce rattling and protect finishes.
- Review the layout after a month and move tools that consistently end up in the wrong drawer.
What's inside
A well-organized tool chest does more than make a workshop look tidy. It reduces the time spent hunting for a bit, prevents duplicate purchases, and makes it easier to notice when a tool is missing. In a home-appliance testing lab, where screwdrivers, sockets, pliers, measuring tools, and specialty bits are used repeatedly, layout directly affects accuracy and workflow. The same principle applies to a garage, utility room, or home workbench.
This guide explains how to organize a tool chest around frequency of use, tool type, drawer capacity, and safe weight distribution. It also covers practical organizer options, including modular trays, socket holders, and rolling storage, so you can build a system that remains useful as your collection grows.
As an Amazon Associate we earn from qualifying purchases.



1. Empty the Chest and Sort by Function
Start with a completely empty chest. Wipe out each drawer and inspect the slides, liners, and locking mechanism before putting anything back. Then group tools by function rather than brand: driving tools, pliers and cutters, wrenches, sockets, measuring equipment, electrical tools, fasteners, and appliance-specific accessories.
Within each category, separate everyday tools from occasional-use items. A Phillips screwdriver, adjustable wrench, tape measure, and common socket set deserve the most accessible space. A specialty bit or rarely used puller can go in a lower or less convenient drawer. This simple distinction prevents the top drawers from becoming crowded with tools you use only once or twice a year.
2. Match the Organizer to the Drawer
Measure the usable length, width, and depth of each drawer—not just the chest’s advertised dimensions. Account for drawer liners, raised edges, and the clearance needed for the drawer to close. Shallow trays are ideal for small hand tools and fasteners, while deeper compartments work better for pliers, adapters, and bulky accessories.
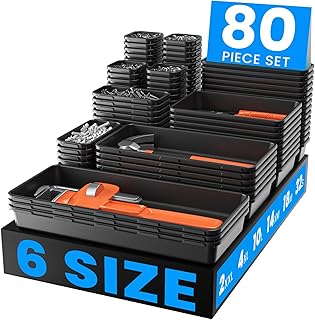
Adjustable divider sets are useful because tool collections rarely remain static. The A-LuGei 69-piece, five-size tray divider set offers a broad selection of compartment sizes for drawers, cabinets, and rolling chests. For a larger collection, the A-LUGEI six-size, 80-piece organizer is designed to accommodate many individual tools and small parts. Avoid filling every inch: leave some room so tools can be lifted out without disturbing neighboring compartments.
3. Store Tools Upright or in a Single Layer
The most efficient arrangement is usually one visible layer per drawer. If tools are stacked, the item you need is likely to be underneath something else, which defeats the purpose of organization. Screwdrivers can lie in individual channels or stand in a deep holder; pliers and cutters are often easiest to identify when placed side by side with handles facing the same direction.
For mixed-size drawers, combine fixed zones with adjustable dividers. The A-LuGei 46-piece, five-size organizer is a practical choice for smaller parts and bathroom or utility drawers as well as tool chests. Its varied tray sizes can separate electrical connectors, spare screws, blades, and compact hand tools without requiring a custom insert.
Extra-thick plastic trays, such as the A-LuGei six-size tool chest organizer, can be helpful when drawers are opened frequently or when compartments hold heavier metal tools. Check that the tray walls do not flex into the drawer slide path and that the arrangement still leaves room for the drawer to close smoothly.
4. Give Sockets and Small Parts Their Own System
Sockets are particularly easy to lose because they are similar in appearance and often spread across several drawers. Keep each drive size together, then separate SAE and metric sets. Within each group, arrange sockets from small to large and mark the drive size clearly. Deep and shallow sockets should have distinct rows so you do not need to inspect every piece.
The EACELIY magnetic socket organizer set supports 1/2-inch, 1/4-inch, and 3/8-inch SAE and metric sockets and attaches to a steel tool chest or cart. Because the sockets are held magnetically, the set can make individual pieces easier to identify and retrieve. Confirm that your chest is ferromagnetic before relying on the magnetic attachment, and remember that the organizer does not include sockets.
Use small removable bins for washers, fuses, hose clamps, and appliance fasteners. Label the bins with both the item and its size—for example, “M4 machine screws” is more useful than simply “screws.”
5. Plan Weight, Mobility, and Future Expansion
Put heavier items in the lowest drawers to improve stability and reduce strain on the drawer slides. Medium-weight hand tools belong in the middle, while light accessories and frequently used measuring tools can go near the top. Do not exceed the manufacturer’s drawer capacity, particularly in older chests with worn slides.
If your tools need to move between a garage and a work area, a modular rolling system may be more convenient than a stationary chest. The Keter Stack N Rolling Tool Box Modular Storage System is a three-piece option with all-terrain wheels, a telescoping handle, and weather-resistant construction. It is best suited to portable storage and larger equipment rather than precision drawer organization. Store sensitive meters, batteries, and metal tools in dry conditions even when a storage box is weatherproof.
Tips
- Place a tool back in the same compartment every time; consistency matters more than a perfect first layout.
- Use drawer labels or a simple inventory list for specialty tools and duplicate sizes.
- Line metal-on-metal contact points with thin drawer mats to reduce rattling and protect finishes.
- Review the layout after a month and move tools that consistently end up in the wrong drawer.
Frequently Asked Questions
Should tools be organized by type or by frequency of use?
Use both. Group tools by type, then place the most frequently used groupings in the easiest-to-reach drawers. For example, common screwdrivers and pliers may deserve the top drawer, while specialty electrical tools can remain together in a lower drawer.
Are adjustable divider trays better than foam inserts?
Adjustable trays are usually more flexible and less expensive when your collection changes. Foam inserts provide excellent visibility and tool retention but require more planning and may need to be recut when tools are replaced. Choose foam for a stable professional kit and dividers for an evolving home workshop.
How should I organize a very shallow tool chest?
Prioritize slim trays, magnetic holders, and single-layer storage. Keep bulky power-tool accessories elsewhere, and avoid placing loose tools directly on top of one another. A shallow drawer works especially well for bits, hex keys, precision drivers, and measuring tools.
How often should a tool chest be reorganized?
Perform a quick reset after major projects and a fuller review every few months. Remove broken or duplicate items, check for rust, and verify that heavy drawers still open smoothly. Reorganization is also a good time to replace damaged dividers and update labels.
Conclusion
The best tool-chest layout is visible, adjustable, and built around the way you actually work. Sort by function, keep common tools in single layers, dedicate a system to sockets and small parts, and distribute weight carefully. A few well-sized organizers can turn a crowded chest into a dependable workstation—and make every repair or test faster from the first drawer pull.