
Key takeaways
- Start with your heaviest drop. If a loaded bar will ever hit the floor, you want 3/4″ rubber under the lifting zone. Foam compresses permanently under 300+ pounds of point load, and 1/4″ rolled rubber transmits shock straight into the slab.
- Check your subfloor before anything else. Concrete needs a moisture test — tape a 2×2 foot square of plastic sheeting down for 24 hours and look for condensation. Wood subfloors over a finished room below need extra sound isolation, not just impact padding.
- Decide between coverage and zones. Full wall-to-wall looks finished but costs double. A cheaper approach: foam or vinyl across the whole room, then a 6×8 rubber island where the rack and platform live.
- Factor in the smell. Recycled rubber, especially stall mats, off-gasses noticeably for two to six weeks. Plan for ventilation or an outdoor airing-out period, and skip rubber entirely if the gym shares air with a bedroom.
- Weigh the install against your back. A single 4×6 stall mat weighs about 95 pounds. Foam tiles weigh two pounds each. That difference decides whether this is a solo Saturday project or one that requires a friend and a hand truck.
What's inside
The moment a 45-pound plate slips off the sleeve and lands on bare concrete, you learn everything you need to know about gym flooring. Concrete doesn’t forgive. It chips, it rings through the whole house, and it sends the plate bouncing sideways toward your water heater. A garage or basement lifting space needs a layer between iron and slab, and the good news is that the layer doesn’t have to cost more than the barbell sitting on top of it.
This guide covers six flooring approaches that real home gyms actually use, ranked by what they cost per square foot and how much sweat the install takes. A 10×12 platform area runs anywhere from about $90 in foam tiles to roughly $450 in rolled rubber, and the difference isn’t just money — it’s noise, smell, drag resistance for sleds, and whether the surface survives a dropped kettlebell or dents permanently. Measure your space first, then match the material to the heaviest thing you plan to drop on it.
As an Amazon Associate we earn from qualifying purchases at no extra cost to you. Product prices and availability are accurate as of the date shown and are subject to change.

#1 Pick

#2 Pick

#3 Pick

#4 Pick

#5 Pick

#6 Pick
#7 Pick

Quick Comparison
| Flooring Type | Typical Thickness | Approx. Cost/sq ft | Install Difficulty | Best For |
|---|---|---|---|---|
| Interlocking EVA foam tiles | 1/2″ – 3/4″ | $0.70 – $1.20 | Very easy | Bodyweight, yoga, light dumbbells |
| Horse stall mats | 3/4″ | $1.50 – $2.20 | Hard (weight) | Heavy barbell work, deadlifts |
| Rolled rubber | 1/4″ – 3/8″ | $2.00 – $3.50 | Moderate | Seamless wall-to-wall coverage |
| Interlocking rubber tiles | 3/8″ – 1/2″ | $2.50 – $4.00 | Easy | Odd-shaped rooms, renters |
| Artificial turf roll | 3/4″ pile | $2.00 – $3.00 | Moderate | Sled pushes, sprints, mobility |
| Vinyl plank over underlayment | 5mm + 2mm pad | $2.50 – $4.50 | Moderate | Multipurpose rooms, cardio |
How to Choose
- Start with your heaviest drop. If a loaded bar will ever hit the floor, you want 3/4″ rubber under the lifting zone. Foam compresses permanently under 300+ pounds of point load, and 1/4″ rolled rubber transmits shock straight into the slab.
- Check your subfloor before anything else. Concrete needs a moisture test — tape a 2×2 foot square of plastic sheeting down for 24 hours and look for condensation. Wood subfloors over a finished room below need extra sound isolation, not just impact padding.
- Decide between coverage and zones. Full wall-to-wall looks finished but costs double. A cheaper approach: foam or vinyl across the whole room, then a 6×8 rubber island where the rack and platform live.
- Factor in the smell. Recycled rubber, especially stall mats, off-gasses noticeably for two to six weeks. Plan for ventilation or an outdoor airing-out period, and skip rubber entirely if the gym shares air with a bedroom.
- Weigh the install against your back. A single 4×6 stall mat weighs about 95 pounds. Foam tiles weigh two pounds each. That difference decides whether this is a solo Saturday project or one that requires a friend and a hand truck.
Top Picks Reviewed
3/4″ Interlocking EVA Foam Tiles — Best Budget Starting Point
These are the puzzle-piece tiles sold in packs of six, covering about 24 square feet per box. They cushion joints for burpees and planks, they cut with a utility knife, and a 200 square foot room goes down in under an hour with zero adhesive. The honest limitation: dumbbell corners leave dents, and a bar dropped from hip height will crater a tile. Treat them as a comfort layer for movement-based training, not a platform. The high-density versions with textured tatami-style tops resist sliding better than the smooth ones.
3/4″ Rubber Horse Stall Mats — Best Value for Heavy Lifting
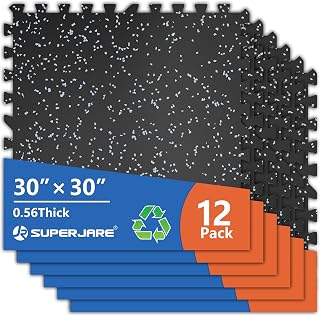
Nothing beats the price-to-durability ratio here. Four mats at 4×6 feet cover 96 square feet for roughly $180 and will absorb dropped deadlifts for a decade. They lie flat under their own weight without glue, and the seams tighten up if you cut the edges square with a straightedge and a fresh hook blade. The tradeoffs are real: dead weight that fights you on stairs, a strong tire-shop odor for the first month, and edges that need trimming to sit flush. Still the default answer for a garage platform.
1/4″ Rolled Rubber Flooring — Best Seamless Coverage
Sold in 4-foot-wide rolls by the linear foot, this gives a commercial-gym look with only one or two seams in a typical room. It rolls out over concrete, sits still under equipment weight, and cleans easily with a damp mop. Use double-sided seam tape rather than full-spread adhesive if you might move. At a quarter inch it handles machines, benches, and moderate dumbbell drops, but layer a stall mat or drop pads over it for anything above 225 pounds.
1/2″ Interlocking Rubber Tiles — Best for Awkward Rooms
Basements are rarely rectangles. Interlocking rubber tiles solve the pillar, the bulkhead, and the water main with a knife instead of a compromise. Each tile is manageable at 20 to 30 pounds, they pull apart if you move, and the tight puzzle joints stay closed under equipment. Expect to pay a premium over stall mats for that flexibility, and buy 10 percent extra for cut waste.
Artificial Turf Roll — Best for Sleds and Sprints
If your gym includes a sled, a Prowler, or bear crawls, a 4-foot turf lane changes the space entirely. The short-pile, non-infill versions designed for indoor training give enough drag for pushes without shredding, and they double as a comfortable surface for stretching and pin-drills. Install it as a strip alongside your rubber rather than throughout — turf under a bench or rack compresses unevenly.
Vinyl Plank Over Foam Underlayment — Best for Shared Spaces
For a spare bedroom or finished basement doing double duty as a gym, rigid-core vinyl plank over a 2mm acoustic pad handles a treadmill, bike, and light dumbbell work while still looking like a floor someone lives on. Click-lock planks float without adhesive and lift out for repairs. Put a dedicated rubber mat under any machine with a motor, and don’t drop anything heavier than a 20-pound dumbbell on it.
Frequently Asked Questions
How thick does gym flooring need to be for deadlifts?
Three-quarters of an inch of dense rubber is the practical minimum for repeated barbell drops onto concrete. Below that, the shock reaches the slab and cracks are a matter of time. For heavy pulls above 400 pounds, add a plywood-and-rubber lifting platform or dedicated drop pads over the base layer.
Will rubber flooring stain or damage my concrete?
Recycled rubber can leach a faint brown discoloration onto bare concrete, especially where moisture gets trapped. Sealing the slab first with a concrete sealer prevents this and takes an afternoon. Never install rubber over concrete that failed a moisture test — mold grows underneath where you can’t see it.
Do I need to glue anything down?
Usually not. Stall mats, rolled rubber, and interlocking tiles all hold position through weight and friction. Glue only makes sense for rolled rubber in a high-traffic commercial setting or in a room where a door sweep constantly catches an edge. Seam tape solves most shifting problems and stays reversible.
How do I cut rubber flooring cleanly?
Score deep with a fresh hook blade against a metal straightedge, flex the mat open, then repeat the cut through the fold. Three or four passes beat one aggressive attempt. Change blades often — a dull blade wanders and gives you a ragged edge you’ll stare at forever.
Final Thoughts
The right choice comes down to one question: what is the heaviest object that will ever hit this floor? Answer honestly and the decision makes itself. Serious barbell training points to 3/4″ stall mats or interlocking rubber, with foam reserved for the mobility corner. Cardio-focused or shared rooms do better with vinyl plank and a good underlayment. And the smartest budget move for most people is a hybrid — cheap coverage everywhere, real rubber where the iron lands. Buy the good stuff for the six by eight feet that matter, and let the rest of the room get by on foam.

Write Your Review
No reviews yet. Be the first to share your experience!