Key takeaways
- Troubleshoot a countertop ice maker that runs but makes no ice, from water and airflow checks to cleaning, sensors and service decisions.
When a countertop ice maker is not making ice, the cause is often simpler than a failed compressor. A low water level, warm incoming water, blocked airflow, an incorrectly seated basket or mineral film on a sensor can stop production even though the lights and fan still work. The safest approach is to check external conditions first, then clean accessible parts, and leave sealed refrigeration or electrical repairs to qualified service.
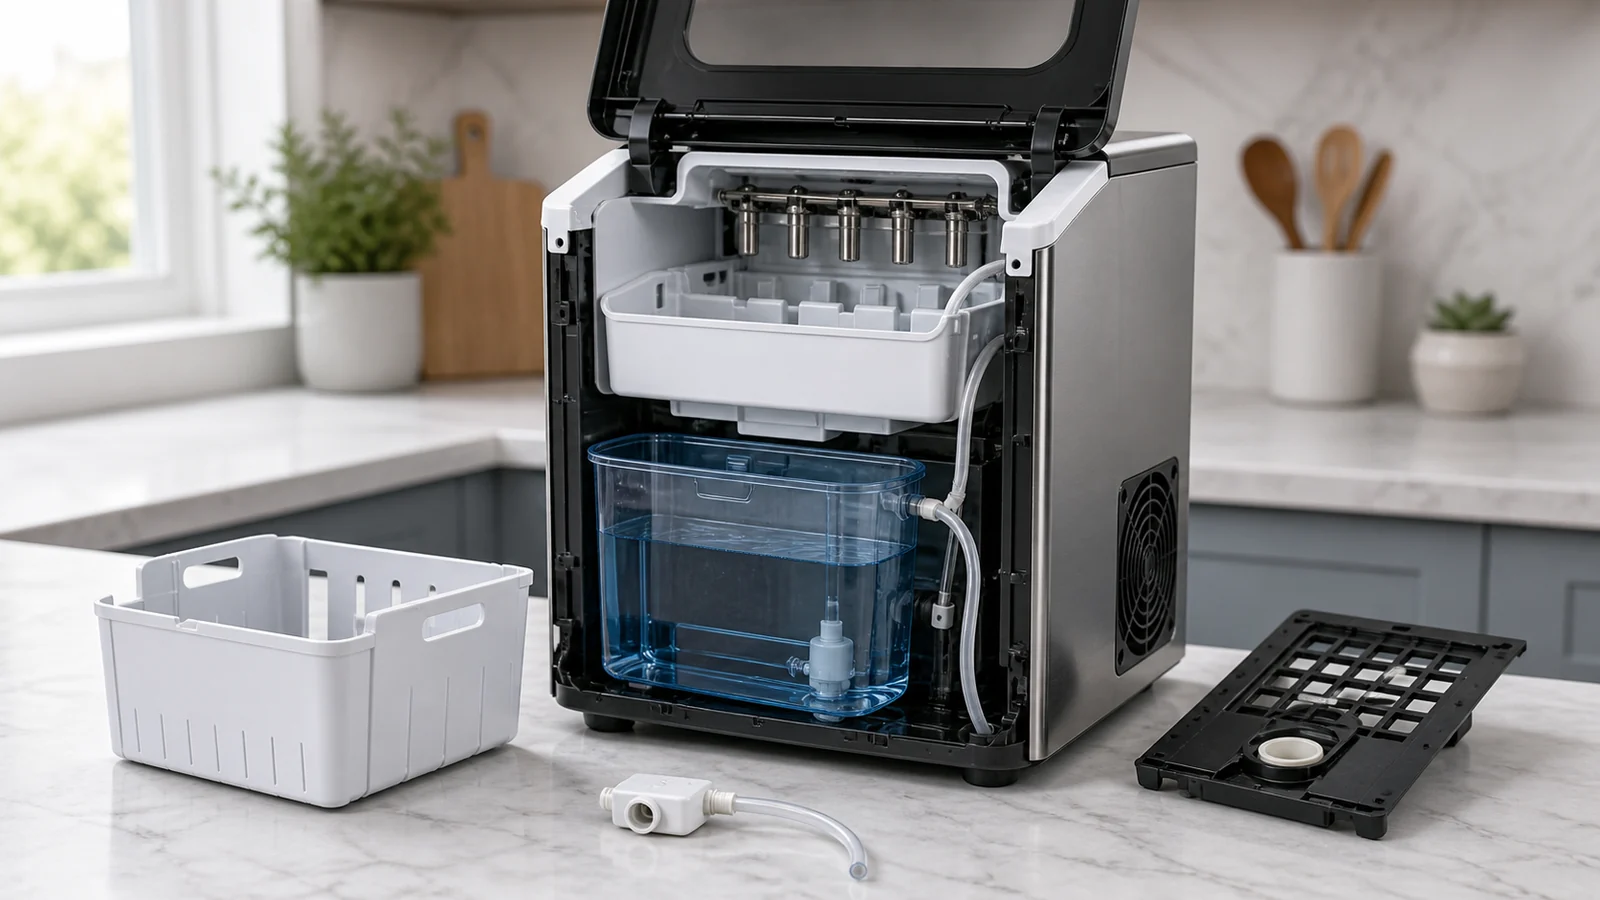
This guide is model-neutral. Button combinations, acceptable water temperatures, inlet-pressure ranges and cleaning chemicals vary. Keep the exact manufacturer manual beside you and treat it as the controlling instruction.
Our top picks



As an Amazon Associate we earn from qualifying purchases at no extra cost to you.
Start by identifying what “not making ice” means
Observe one complete attempt without repeatedly opening the lid. Write down what happens:
- The machine is completely dark.
- Controls illuminate, but the pump and fan never start.
- Water circulates, but no ice forms on the cold surface.
- Ice forms but does not release into the basket.
- One batch appears, then the machine stops.
- An add-water, ice-full or fault indicator remains on.
These symptoms lead to different checks. Also note when the problem began, whether the unit was moved, cleaned or stored, and whether room temperature changed. Do not defeat lid switches, reach into a running mechanism or remove a cabinet panel. Unplug the appliance before touching accessible wet components.
Step 1: confirm safe power and a proper reset
Check that the plug is fully inserted into a grounded receptacle that matches the rating label. Test the receptacle with a small known-working appliance only if it is safe to do so. Avoid extension cords and multi-plug adapters unless the manufacturer expressly permits them; a compressor can draw more current during startup than while running.
Follow the manual’s reset procedure. If none is specified, switch the unit off, unplug it and wait the interval stated by the maker before reconnecting. Do not rapidly cycle power. A compressor protection device may delay restart after power loss, so an immediate lack of cooling does not prove failure.
Stop using the unit if the cord is damaged, the plug becomes hot, a breaker trips repeatedly, or there is a burning smell. Those are service issues, not cleaning tasks.
Step 2: verify water quantity and quality
For a reservoir machine, place it level and fill only to the marked maximum with potable water. Too little water can trigger the low-water sensor; overfilling can interfere with circulation. Reseat the tank, cap or side reservoir exactly as the manual shows. If the appliance was recently transported, inspect for a shipping plug, kinked gravity hose or incorrectly fitted drain cap.
For an approved direct-connect model, confirm that the shutoff valve is open, the supply tube is not kinked and there is no leak. Never connect household pressure to a reservoir-only unit. Buyers considering continuous fill should first understand the differences described in this countertop ice maker water-line guide.
Use the water type the manufacturer recommends. Extremely warm water lengthens freeze time, while frozen water, boiling water and non-water liquids can damage the appliance. If a filter is required, verify that it is installed in the correct direction and has not exceeded its specified capacity or replacement interval.
Step 3: improve airflow and room conditions
Countertop ice makers reject heat into the room. Move the unit away from an oven, sunny window or other heat-producing appliance, and provide the clearances listed in its manual. Dust at an external intake can be removed with the unit unplugged and a soft brush or vacuum used gently outside the cabinet.
Do not block vents with towels, containers or a wall placed closer than allowed. A very warm room or warm supply water can slow a batch and reduce daily output. Published “pounds per day” figures normally reflect specified test conditions, not every kitchen. Give the appliance time to stabilize after relocation.
Step 4: inspect accessible water paths
Unplug the machine and remove the basket. Look for a loose drain plug, visible debris in the reservoir, a blocked accessible screen or a float that cannot move freely. Clean only components the manual identifies as user-serviceable. Never insert wire into a pump, nozzle or refrigeration opening.
If water does not circulate after correct setup, listen for the pump. A hum with no flow can indicate an airlock, obstruction or pump problem, but the remedy is model-specific. Follow the manufacturer’s priming steps, if provided. If there is no authorized priming procedure, contact support rather than tilting a powered machine or adding pressure.
Step 5: clean the sensors and food-contact area
Mineral deposits or water film can fool optical or mechanical sensors into reporting “ice full” or “add water.” With the unit unplugged, wipe accessible sensor windows and reservoir surfaces using a soft cloth and the cleaning solution approved in the manual. Avoid abrasive pads, chlorine mixtures and improvised chemical combinations.
A self-clean program circulates solution, but it does not replace washing the basket, scoop and accessible surfaces. Our countertop ice maker cleaning guide explains a cautious drain, clean, rinse and dry sequence. Discard the first batches after any cleaning procedure as directed by the manufacturer.
Step 6: check the basket, lid and ice-full condition
An incorrectly seated basket can contact a sensor or prevent harvested ice from falling correctly. Empty the basket, remove any fused pieces and reinstall it. Wipe condensation from an optical sensor if the manual identifies one. Make sure the lid closes without an object blocking it.
Countertop machines generally do not store ice like a freezer. Finished pieces can melt and return water to the reservoir. A mound near the sensor may stop production while the rest of the basket looks partly empty. Redistribute or transfer finished ice with a clean scoop instead of pushing a hand into the machine.
If ice forms but will not release
Ice that remains attached may result from interrupted cycles, scale on the freezing surface, unsuitable water conditions or a harvest mechanism fault. Turn the unit off and let ice release naturally according to the manual. Do not pry it off with a knife or screwdriver; sharp tools can puncture a refrigerant tube or damage a food-contact surface.
Run the maker-approved descaling cycle when scale is visible or cleaning is overdue. If the same slab repeatedly fails to release after proper cleaning and normal operating conditions, document the symptom and seek warranty service.
If it makes one batch and stops
Check the indicator state immediately. The machine may genuinely sense a full basket, need more water, enter compressor protection or encounter high ambient temperature. Empty the basket, top up within the fill marks and restore ventilation. Then allow the specified restart delay.
If melted water is not returning to the reservoir, inspect accessible drain channels for debris with the appliance unplugged. For plumbed models, confirm that supply and drain arrangements match the manual; a supply hose and a drain hose are not interchangeable.
Error lights and unusual noises
Record the exact light pattern or code rather than guessing. A flashing symbol can have a different meaning across brands and revisions. Photograph the rating label and controls, then consult the manual for that model.
Normal sounds may include water movement, fan airflow, ice dropping and compressor cycling. Grinding, repeated hard clicking, loud metal contact or a fan that cannot spin freely warrants shutdown. Never lubricate internal parts with household oil unless the manufacturer explicitly instructs it.
When to stop troubleshooting
Disconnect the unit and arrange service when you find a refrigerant-like oily residue, damaged wiring, repeated electrical trips, a persistent leak near electrical components, a seized fan, or no cooling after external checks and an authorized reset. Sealed-system refrigerant work requires trained personnel and applicable handling rules.
Before calling, gather the model, serial number, purchase date, error code, room conditions, water source and a short video of the cycle. State which manual steps you completed. This evidence helps support distinguish setup trouble from a failed pump, sensor, control board or sealed system.
Prevention after the machine works again
Drain stale water, wash removable parts and dry the interior on the schedule in the manual. Descale more often when mineral film returns quickly. Keep vents clear and transfer ice with a clean scoop. If the machine will sit unused, follow its storage and winterization directions rather than leaving water inside.
If maintenance access is a priority in a replacement, compare drain layout, removable parts and documented cleaning instructions—not only the presence of a “clean” button. This overview of self-cleaning countertop ice makers explains why automation still needs routine hand care. Because the FDA treats ice as food, clean scoops, food-safe containers and sanitary water handling belong in the routine too.
Frequently asked questions
How long should a countertop ice maker take to start?
There is no universal time. Initial production depends on the model, incoming water, room temperature and compressor protection delay. Use the range in the exact manual and allow extra time after moving or reconnecting the appliance.
Can vinegar fix an ice maker that is not producing?
Vinegar may be permitted by some manufacturers for scale, but others specify a different concentration or a nickel-safe commercial cleaner. It cannot repair a failed pump, sensor or refrigeration system. Use only an approved method and rinse exactly as directed.
Why does the add-water light stay on when the reservoir is full?
Possible causes include an incorrectly seated reservoir, trapped air, mineral film on an accessible sensor, a blocked inlet or an electrical sensor fault. Clean and reseat only user-serviceable parts; seek service if the warning persists.
Bottom line
Troubleshoot a countertop ice maker from the outside inward: confirm safe power, correct water, ventilation, basket position and cleaning before suspecting internal failure. Respect the manual, avoid cabinet disassembly and stop at any electrical, refrigerant or persistent leak symptom. A careful symptom log is more useful—and safer—than repeated resets or improvised repairs.